Before we talk about any equipment, we will suggest that you understand what the nitrogen cycle is, what types of cycling there are for saltwater aquariums, and how to properly go through a full cycle. Please read the following article below to fully understand why many aquarium shops, people, and sometimes booklets are incorrect on how to properly prepare an aquarium before adding in any inhabitants.
Article
The Nitrogen Cycle
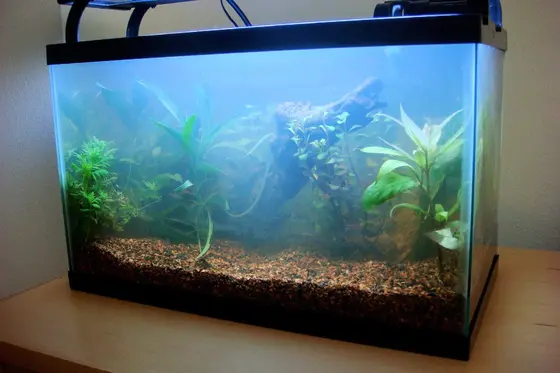
In a closed environment, such as your aquarium, many things such as fish waste, excess food, decaying plant matter (if you have live plants) will build up toxins inside of the water. Since there is no big water to dilute such factors, we must make sure that we create and have a stable biological filtration to break down toxins happening at all times. There are three common stages to this biological filtration, in which different types of beneficial bacteria eat only a specific type of toxin that is created naturally.
Aquarium Tanks & Stands
When selecting an aquarium tank size to get, everyone will always say the bigger the better. Now, you might be thinking this is just because you can have more fish, invertebrates, and it'll become a showpiece in your house or room. Ironically the bigger you go the easier it is to maintain a healthy aquarium since you will have to do fewer water changes and as a new person to the hobby, you will have more room to slack on certain aspects. However many people cannot afford to go for the biggest tank that their aquarium store sells, so the most common starting tank sizes include 40 gallons (151.4 liters), 55 gallons (208.2 liters), and lastly the 120 (454.3 liters) gallons size. Anything smaller might seem very tempting to get, however you will only be limiting yourself as they require more maintenance and precise conditions (due to the smaller amount of water volume). If you are experienced in keeping saltwater aquariums running successfully, selecting a nano aquarium (less than 15 gallons) can be very rewarding.
Many "all-in-one" kits might seem like the perfect choice when trying to find a reasonable price on an aquarium set since most contain almost everything that is needed to get an aquarium going quickly. Sadly, a lot of the all-in-one kits will have some sort of flaw, whether it be a highly overpowered filter, an underrated heater, or in rare cases a lighting system that is under quality and very poor. If done correctly, you can always buy the proper equipment without ever needing to upgrade for around the same price (if not a little more) than these all-in-one kits.
After you pick out your tank size, now comes the part of figuring out if you want to buy a stand manufacturer, make your stand, or use a piece of furniture as a stand. Before you try one of these, please be aware of how heavy water truly is (and the tank will be even heavier since you will have a substrate, decorations, filter, heater attached, and more to weigh it all down). As an example, 10 gallons (75.7 liters) aquarium fully setup can weigh around 100 pounds (45.7 kilograms) and some setups may not support the whole aquarium evenly creating stress on pieces of glass or joints unequally.
Now that you have selected your aquarium tank and a stand, we move on to the more essential equipment that will act as the life support system for your inhabitants. Making sure to correctly get the right equipment the first time is vital since in some cases getting the wrong (under-powered or worse overpowered) items can lead to high death rates or higher maintenance than what would be normally required.
There are tons of different types of filters, all that make promises to do various stages of chemical, biological, and/or mechanical filtration with various types of filter media. Many people think that a filter does the same thing as another type, and while they are somewhat correct they are not fully. You have to remember that fish normally live in an open environment in which their waste is diluted very quickly (if not right away), and by keeping them in an aquarium we are taking that open ecosystem and creating a closed environment. Turning the toxins at were discussed in The Nitrogen Cycle and breaking them down so that they do not harm the inhabitants while also keeping the water clean of any debris, excess food, or various materials as well. When selecting a filter you want to get one that has double the filtration capacity as the aquarium size (in the example we want a filter rated for 40 gallons if we have a 20 gallons tank). We are going to break down the various categories of filters into their main groups to explain how they work, what they look like, and a rough price estimate on them.
One major thing that many shops, people, and booklets get wrong is when to replace the filter media. Many manufacturers will state that you need to replace all of the media in a given time frame however, this is very dangerous and harmful to your aquarium. The only time that you should replace any media is when it is falling apart into pieces otherwise if you need to clean it only do so with the aquarium's water and make sure to limit the time it is left out in the air to as little as possible. If required to change any media, leave the old media inside with the new media so that all of the beneficial bacteria can migrate from the old to the new. If you do not do this or change all of the media at once you will have to repeat cycling your aquarium all over again, which depending on stocking levels can be very dangerous and time-consuming and lead to man deaths.
Hang-on-Back (HOB) Filters: A filter that is placed outside of the aquarium which hangs on the glass with an intake tube that is placed inside of the water and the output is a small downslope that slides (or depending on the water level can be a waterfall) into the water column. These filters contain various types of filter media, most commonly they will contain a sponge, a carbon pad/beads, and also will contain bio-beads where the beneficial bacteria live. These types of filters allow for chemical, biological, and mechanical (however this all depends on the product exactly) and are the most common types of filters that you will see various levels of aquarium keepers have. These require some forms of maintenance over time if the propeller starts to slow down, the media gets too dirty, or other causes.
Canister Filters: A filter that is normally placed inside of the aquarium stand, in which two tubes (one of the intake and the other for the output) are connected to their respective plastic parts that are suctioned inside of the aquarium's water. Inside contains various types of filter media, most commonly it will contain one to three types of different consistency-based sponges, a carbon pad/beads, and also will contain bio-beads where the beneficial bacteria live. These types of filters allow for chemical, biological, and mechanical and are the most powerful, maintenance-free (most require any changes of filter media for years), and quietest filters on the market. Sadly these are also the most expensive type of filter due to their design, and how much water they clean through daily.
Sumps: A sump requires that there are either drilled holes inside of the tank, or an overflow box at the top that allows for water to be delivered to the sump. This normally goes through some type of filter sock to trap bigger particles, some filter media, and then through various chambers that tend to include (but not required to); an aeration method to add oxygen to the water, a protein skimmer, a refugium, an automatic water filler, heaters/chiller input/output to hide it from the display aspect of the tank, and various types of probes for detecting aspects that need to be watched (salinity, pH, etc.). Sumps are normally sized to match their aquarium to be most effective, while also having the required chambers to allow for the best ways to maintain the tank with everything being out of sight from those who are viewing the aquarium above.
Refugiums: A refugium typically contains aragonite live rock, macroalgae, and a deep sand or mud bed and tends to be the best natural way to filter out your tank (as it would be done in nature without any mechanical aspect). This works by allowing for particles, uneaten food, and debris to settle on the sand or mud bed where microcrustaceans live and break down these aspects while also providing an additional food supply when needed. A majority of those with a refugium tend to have it set on a lighting schedule that is exactly opposite to when the tank is light, to allow for oxygen to be provided during all hours (compared to none being provided during the night time when the lights are all off). Refugiums are highly beneficial in that they can allow for algae to be limited to just the refugium (compared to in the tank), allows for water to be filtered more naturally, adds extra stability to the water parameters, and can add in backtrace elements when items are broken down back into the water column.
There are many different types of substrate to choose from that can be used. Below we will go over all of the choices, and what substrate is the best for your specific needs including a list of positive and negative aspects.
Sand Based: Having a sand substrate is one of the most natural-looking substrates out there since it allows for you to be mimicking the ocean but instead of it being saltwater you have freshwater. There are many different colors of sand that you can buy now, instead of just the natural-looking tan there is pink, blue, green, red, purple, black, white, gray, and almost any other color combination that you can think of. Depending on what types of fish and invertebrates you are keeping, sand might become a requirement to have as your substrate. When first using sand and filling up your aquarium, you must do so very slowly and over a plate (or some other covering to make sure that you are not just pouring it on the sand directly). The downside to this is that you will end up with a very cloudy water column, due to the fine grains of sand you must not turn on any filters since you will risk damaging the propellers, any type of debris can be seen laying on the sand, it's hard to clean since any movement will create another small cloud of sand for a few minutes to hours, and lastly the sand will need to be mixed (or poked) to release any buildup of trapped gases.
Aragonite Based: Aragonite is one of the most common types of substrate that is used in marine-like tanks, due it to being able to maintain the required pH level of 8.2 that corals need. As the Aragonite slowly dissolves into the water, it releases calcium carbonate into the water which is then consumed by the invertebrates to build their shells and used by corals to build their skeletons. There are a variety of different types of grain sizes to allow for the correct size that you may need, but also is used whenever there is any type of sand sifters since it is light enough to be moved, doesn't damage their bodies when they bury themselves into it, but heavy enough to not be pushed around by any wavemakers.
Crushed Coral Based: A crushed coral substrate is commonly found in tanks that require a high level of circulation as due to its weight, is less likely to be blown into the water or moved around easier. It mostly consists of a mix of limestone, coral pieces, and shells of snails or other various types of invertebrates. Sadly, this is comparable to the gravel of saltwater since it allows for the detritus as able to settle into the gaps between the grains. Over time this can require maintenance since there isn't a way for the detritus to be moved around and can cause high ammonia levels as it rots or decomposes. Additionally, any sand sifting inhabitants that like to bury themselves in the sand and/or sift it through their mouths are unable to do this as the grain sizes are too large for them to be able to be sifted.
In many cases, the standard lighting fixture that comes with your aquarium will do just fine for viewing the inhabitants. If your aquarium did not come with a lighting fixture then there are many to choose from based on your needs. The most common ones being sold currently are LED lights, in which the LEDs last almost a lifetime and are very bright. Other fixtures include higher light ratings which will provide the most benefit if you plan on growing any corals inside of your aquarium. With any type of light, we would suggest that you make sure that you do not leave it on for more than 10 hours a day at a time, as having it on any longer will increase the chances of algae growing exponentially.
Some lighting fixtures come with moonlight, or a very dim blue light to be used during the night. Sadly, like all animals in this world, they require a night cycle of pure darkness. Leaving the lights on and never turning them off can do serious damage to your fish, including them being very sluggish all of the time, never truly eating when you place food inside of the aquarium, and worse it can lead to death. If you do wish to use the moonlight feature, we would suggest turning it on about an hour before you turn on the main lights in the morning and then leaving them on for an hour after you turn off the main lights at night.
Having an adjustable heater is something that is highly recommended since you can maintain the temperature throughout the whole aquarium by moving the switch from one degree to another. This is because many preset heaters, or always on heaters do not turn off when they reach a specific temperature (unlike adjustable ones) and you can cook your inhabitants to death. Since there are many different manufacturers, we suggest that you read the product's back packaging to know the specific watts you need for your aquarium size.
Thermometers are another highly important piece of this puzzle, as although you may have an adjustable heater in most cases they are off anywhere between 0-5 degrees. Since this is a big range, making sure that you have a liquid-based thermometer is very important as the strip-based ones are very inaccurate and cannot show what the specific temperature is (only the range it is in).
Chillers are required since they will keep the aquarium water from reaching above any set temperature as saltwater tanks require cooler than normal freshwater temperatures. Without a heater, during the day (dependent on your region), it could get warmer than allowed and result in a majority of your fish, corals, or microscopic marine life dying off. All chillers are rated in terms of HP (horsepower), how much water they can handle per hour (mostly noted as a min./max. on the unit itself), and a specific temperature of the temperate range where you can have it automatically turn on/off to save power. It is always suggested to get a chiller that can handle between the min. and max. the water flow of your aquarium. Always plan on what type of chiller you believe you will need as they do output heat, and some require additional plumbing and considerations.
All of them have specific needs or types of aquariums that they should be used for and can be categorized into the below. We will highlight when they should be used, thought of, and also highlight some of the key concerns that should be brought up before purchasing one.
In-Line Chillers: A in-line chiller is almost exactly as it is called, a chiller that is in line with water flow in one form or another, push through cold coils, and is then pumped back into the aquarium. These can be placed anywhere (and as far as the pump can support) from the aquarium itself and is useful for locations where there may not be a good place near the aquarium for the heat that is emitted to be pushed into the air.
Drop-In Chillers: A drop-in chiller is where the coils that cool the water are placed directly into an area where water from the tanks is circulated (commonly a sump for example). Since the way that these are designed, there is no additional plumbing or pumps, but the heat that is emitted from these is directly released near the aquarium (and can cause the room to become warmer than it would normally).
A reactor can be considered essential depending on the tank, setup, and situation. In a vast majority of cases, the main ones that are considered a must-have are related to Calcium (to keep calcium levels set) and GFO (Phosphate - which is used to lower phosphate levels in the aquarium that build up over time naturally). There are a handful of other ones, but they tend to be used in a very specific set of situations and are not widely as common as the two mentioned before.
Calcium Reactor: A calcium reactor is a device that is filled with aragonite, and the water is pumped into the reactor along with CO2. The CO2 allows for the pH level inside of the reactor to become at an acidic level, causing the aragonite to slowly dissolve over time and allowed to be dripped back into the aquarium. There is also a bubble counter that is attached to the reactor, which will allow for it to calculate when it needs to function slower/faster than it currently is to maintain a set level. Contrary to beliefs, aragonite also allows for more than calcium to be released, but also for other trace minerals that are dissolved and allowed to be added back into the aquarium water.
GFO (Phosphate) Reactor: A GFO (Phosphate) reactor is filled with ferric oxide, and the water is pumped into the reactor. The ferric oxide will require phosphate that is created from uneaten food, fish waste, decaying corals/plants, bacteria, and more and absorb it into the media. This is normally paired with a protein skimmer and is commonly found on aquariums that require heavy feeding either due to their size or various types of inhabitants that are kept inside.
Carbon Reactor: A carbon reactor is filled with carbon, and is normally only used for removing any odors, discoloration, chemicals (after dosing medicine for example), and tends to be used only in emergencies. Unlike the other reactors, over time carbon loses its ability to hold what it has absorbed and will slowly leach back out what it contains if not properly removed and cleaned out. Additionally, over time carbon will leach out phosphate into the aquarium water which is something that we are trying to keep low as is.
Powerheads: A powerhead is essentials a small fan that runs at the same speed to push water through it and towards/at a specific area in the tank. This allows for the water to circulate over the tank which is required for saltwater since it needs to have a higher turnover rate compared to freshwater (for example). Many use this to provide corals (especially those with fans or parts that sway in the water) movement so that they can catch their food when it's released into the water column. Other times, this is used to remove any possible dead spots in the tanks and allow for the inhabitants to have a natural environment where there is a current and it varies from spot to spot.
Wavemakers: A wave marker is essential a version of a powerhead, that has a variable set on a fan-like component that will speed up and speed down over time. This, in turn, creates waves throughout the tank that they would normally have in the wild. This is critical for some types of corals since they need wave-like movement to fully absorb (and catch) their food in the water column. Many use a combination of both wave markers at the surface and then a powerhead near the middle to provide enough current and water turnover that is required for a saltwater tank (and to prevent any dead spots from forming where you may want corals at).
Hydrometer: This is a unit that is used to measure the salinity in the aquarium. You normally will place the whole unit underneath the water, and then shake it to make sure that all bubbles are removed (as if there are any bubbles, it can cause the unit to read incorrectly). Then, raise the unit out of the water and place it on a level surface. There is normally a swing-arm that is within the device, and it will show the specific gravity of the water that was taken. The denser the water (the heavier) the higher that the arm in the device will be.
Refractometer: This is a device that measures the refractive index of aquarium water. When using a sample of aquarium water (normally taken and placed into a cup or somewhere that it's stable and not moving with a current), it can measure how much light is bent through the liquid. The more dense the liquid, the smaller the level of refraction, which allows for the device to read the various levels. Overall, refractometers tend to be more reliable when it comes to reading the levels (if you get one that can account for temperature as it does cause a difference), however, they do require more calibration over time to read an effective level (whereas hydrometers do not require this level of calibration).
Protein skimmers act as the natural version of waves in the ocean, by creating the foam from the water splashing where protein is then drawn into and left on the shoreline. In this case, the shoreline is normally a waste collection cup (or a small filter bag) where it's held until manually cleaned out. The best types of protein skimmers will create micro-bubbles (or extremely, fine, small bubbles to draw more protein out of the water than those which may create bigger bubbles overall). Many use a protein skimmer as a standalone piece of equipment in the waterline, in a sump, or as a hang on the back unit dependent on the tank size and requirements.
Over time the constant motion that a protein skimmer creates will wear down, and it's not uncommon to have to replace some parts when you do maintenance on the tank over months to years to allow for the protein skimmer to run at its optimal performance levels.
When it comes to fake coral decorations or using real corals, it mostly depends on the aquarium setup, substrate, and lighting that is being provided. Fake corals tend to provide the hidden areas that many need, however, the advantage of keeping corals is that they will help reduce the toxins that the fish release and use them as nutrition. Most inhabitants can tell the difference between real and fake corals, as many tend to use it as a safe shelter dependent on the type of coral (such as clownfish with anemones). If you are looking into keeping live plants, the most important thing is to make sure that you have the correct lighting for your plant's requirements, as having incorrect lighting will slowly make the plant die or it will stunt its growth. For further information about care with corals, please read the species profiles for each type of coral(s) you want as it goes over in great detail what plants need, how to grow them successfully, and also beginner types of corals that require little to no care additional care when having the correct equipment.
There are a variety of different types of foods from living, flakes, pellets, wafers, to even freeze-dried options out there. On top of that factor, there are tons of different brands that all have their range of ingredients that are combined in specific amounts. Since we do not promote a specific brand of food, make sure that you read the back labeling for the ingredients. Unlike in other types of animal food, the order in which the ingredients are listed is their pure concentration concerning the other ingredients. You want to look for food that does not have the first three ingredients listed as any type of fillers in most cases, you will see that two of the three are not fillers which is still a good brand. If you see any food that has all of the three as fillers then you will want to stay away from that brand, since it does not have that much nutritional value.
Over time, you may notice that they do require more live foods compared to their commercial counterparts, so it may take time (if possible as some are stubborn enough) to make the switch from live food to commercial-based foods. Always ask the breeder or point of purchase what types of foods they are feeding them, since you may want to either mimic these food types and will be able to know if they are mostly eating live foods.